Showing posts with label Recipe. Show all posts

Homemade Oreo Cookies


This is one of the many kinds of post you will be seeing on my new blog! With my site being brand new, I figured I would cross post for the next month!

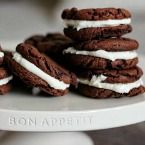
Oreos are one of my favorite cookies (and ice cream flavors in case you were wondering) and from the stats they are also considered to be the world's most favorite cookie! But how could anyone blame us? The chocolate cookie and cream is a classic. But as much as I love a classic Oreo, I would have to say the homemade Oreo cookies my mom made growing up are even better.

By now I feel people are well aware of these box mix Oreo cookies, but when I whipped some up last Sunday for some friends I couldn't help but share the recipe here for you all. Just in case by some small crazy chance you hadn't heard of these yet, you can thank me later!


I got this adorable cake stand from RedEnvelope! RedEnvelope has everything you could imagine, and is a great go to place for gifts! I love how you can personalize anything, like I did with this cake stand. The perfect touch to display your sweets! Get yours!

I shared this recipe over two years ago and it is funny to see how bad my camera was back then :) ENJOY!

HOMEMADE OREOS

PRINT THIS RECIPE
 
Yields: around 3 dozen
For the cookies:
3 pkgs Duncan Hines Devil’s Food Cake mix
6 eggs
1 cup vegetable oil

Directions:
Mix ingredients in a Bosch or Kitchenaid. You can start mixing it with a blender, but eventually you will have to work the mix together with your hands because the mix gets too heavy for a blender.  Roll into walnut size balls.  Do not press.  Bake at 375 for 10 – 12 mins.
When you take them out of the oven tap pan on the counter, this will flatten the cookies. I hold the pan up a few inches from the counter and drop it. You can do this a few times depending on how flat your want your cookie. 

Put two cookies together with the following:
 
ICING
¼ cup margarine or butter                        
1 – 8 oz. pkg. cream cheese
4 cups icing sugar                                     
tsp vanilla
Mix together.  Spread generously.
You can double this icing recipe if you want double stuffed style ;)

TIPS
The icing will be runny at first, if you store in the fridge for a few hours or over night it will firm up and be better for staying in the cookie. Also, if you ice them and let them sit for awhile covered, it will soften the cookie more, making very fluffy and chewable cookies!

overnight stuffed french toast...

courtney and I devoured it all, and apparently we both have the tendency to wear large sports team tops to bed :) haha

Trevor's sister Courtney and her husband Eric have had a bunch of different reasons to come up to Northern Utah lately and have stayed with us three different times now. It has been fun :) Whenever I have house guests, and if I have the time, I like to make something yummy for breakfast. I found a recipe on Pinterest and adapted it a bit to fit my tastes and thought you guys might like it. The beauty of this french toast is how you decide to make it depends on how much time you have. It can be done in the oven, or just cooked up on the skillet the morning of.
 
What You Need (double depending on amount needed)
1 tub  (8 oz.) PHILADELPHIA 1/3 Less Fat than Cream Cheese
3 Tbsp.  sugar
8 slices cinnamon-swirl bread
4 eggs
1/2cup  milk
2cups  sliced fresh strawberries
Teaspoon Vanilla


Make It
Mix reduced-fat cream cheese and sugar until well blended; spread onto bread. Place bread slices, cream cheese-sides up, in a baking dish sprayed with cooking spray. Cover with remaining bread slices, cream cheese-sides down.
Whisk eggs and milk until well blended; pour over bread. Cover; refrigerate overnight.
Heat oven to 350ºF. Bake, uncovered, 30 to 35 min. or until center is set and top is lightly browned. Serve topped with fruit and some powdered sugar :)
*If you are making them the morning of, just make sure the sandwich is fully covered in the egg mixture and cook it right away on a pan until both sides are browned.

peanut butter cup s’mores bars.


Posting about our camping trip earlier this week reminded me that I never shared the recipe of the yummy treats I made for Trevor back in his welcome home post. I thought I would share it now!

Let me start of by saying that Trevor is a huge fan of peanut butter (I mean, who isn't really?!), and because of this, I have made it my mission to keep introducing new yummy peanut butter inspired treats to him :) Thankfully for pinterest, I found this sweet treat, it had Trevor's name written all over it.

Peanut Butter Cup S’mores Bars
(via Mel’s sweet life)

yield: 16 large/20 small squares

Ingredients

    1/2 cup butter, softened
    1/2 cup packed brown sugar
    1/4 cup sugar
    1 egg
    1 teaspoon vanilla
    1 1/4 cups flour
    1 teaspoon baking powder
    1/4 teaspoon salt
    1 cup graham cracker crumbs
    16 peanut butter cups, regular size
    1 1/2 cups marshmallow fluff*

*Fluff is pretty impossible to measure, so this doesn’t have to be an exact amount, just kind of eyeball it. As long as you have enough to cover the PB cups, you’re good to go.

Directions:
+ Preheat the oven to 350 degrees.  Line an 8×8 baking dishing with parchment paper; coat lightly with cooking spray.
+ In a large bowl of the bowl of stand mixer, beat butter and sugars until fluffy.  Beat in egg and vanilla until combined.  Scrape down the sides.  With the mixer on low, stir in the flour, baking powder, salt, and graham cracker crumbs until mixed.
+Spread 2/3 of the dough on the bottom of the prepared baking dish.  Lightly press the peanut butter cups into the dough, then spread marshmallow fluff on top.  Press the remaining dough on a non-stick surface into the shape of an 8×8 square.  Place the square on top of the fluff and press down lightly.
+Bake for 30 minutes or until the edges just begin to brown.  Allow to cool for at least two hours* to give the bars a chance to set, then remove from the pan and cut into squares with a large, sharp knife.
+Let cool - 2+ hours.

*I found the dough to be a little hard to manipulate. I suggest that you put flour on your hands or on a spoon, it makes a huge difference in being able to spread it without it sticking to everything!

Enjoy :)

P.S. Don't think I have forgotten about tid + bits on thursdays! I have decided to make it a monthly link up as opposed to every thursday. So be getting your tid+bits from the month together because the last thursday of every month I will be doing a tid + bits post that you can link up to!

P.S.S. I now have $10 large ads for 30 days! Check out my new advertising system.


mexican caviar.

Well, well... I don't mind if I do.

You know those friends that always bring an amazing dish to a party, or over to your house for dinner? Well that is Molly in my life. She is always creating the yummiest dishes - you know, the kinds where your still eating and can't help but say, "I have to get this recipe!"

Well lucky for you guys, I did. This dish will be a hit no matter where you are - alone, or with a crowd, it is scrumptious. It doesn't hurt that it is totally healthy as well. I love when taste doesn't get compromised for health :)

Mexican Caviar

1 bunch Cilantro (chopped)
1 bunch Green Onions (chopped)
2 Tomatoes (chopped)
2 Avocados (chopped)
1 can black-eyed peas, undrained
1 small bag of frozen corn (thawed)
1 envelope Good Seasons Italian Dressing
1/4 Cup Vinegar
Mix it all together
Add some Lime juice and a diced Jalapeno


This type of dish would be a hit for any party this summer, maybe even for your Fourth of July party :) 
ENJOY!


trevor's salad.


One of you asked about some healthy quick recipes that you could make. I haven't posted a recipe for awhile, so I thought I would share this yummy little salad that Trevor just made the other day. If you ever want an idea for a good salad, all you need do is talk to Trevor. He is the master of salads. I mean he makes me eat one for dinner six nights a week... I wish I was exaggerating!

Trevor got the salad dressing recipe from our family friend (thanks molly!), and it is SUCH a good salad dressing. I mean it had to be good if my husband stopped in the middle of the dinner to ask how she made it haha :) You guys will love it!

Trevor's Salad 
Salad of your choice
Carrots
Avocado (mash up)
Steak (cut into thin slices)
Put it all together and toss it! See I told you it would be easy :)
(Trevor acctually put it all in a tupperware bowl with a lid and shook it all around so he wouldn't get his hands dirty from the avocado.)

Grasshopper Spit Dressing
1 part Red Wine Vinegar
1 part soy sauce or Bragg's Liquid Aminos (better for you)
1 part honey, sugar, or some Stevia (no particular brand)
1 part olive oil (you can leave this out if you want)
Enjoy!!

 
This is Trevor's smile when he doesn't want to be smiling :) haha Love him.

Sopapilla Cheesecake

This past weekend while Trevor and I were down in Provo apartment hunting, I stopped by a Blog Swap Party :) I will give you details on the party later, but until then I wanted to share the recipe of the dessert I brought. When I saw this recipe I got excited because I had read about Sopapilla. Sopapilla is a kind of fried pastry and a type of quick bread served in Argentina, Bolivia, Chile, northern Mexico, New Mexico, Peru, Texas, and Uruguay. I have three brothers, two of which both served LDS missions in Mexico, and my little brother Alex is currently serving in Chile. I am sure this recipe is as far from authentic as you can get to the real Sopapilla but it made me think of my little brother out in Chile, who I have been missing lately.
According to good ol' Wikki, depending if they are served as a pastry or bread Chilean, sopaipillas are served with either mustard, ketchup, manjar, chancaca sauce (sopaipillas pasadas), hot butter, or pebre, a sauce of onion, tomato, garlic, and herbs. In Chile sopaipillas are traditionally made and eaten during days of rain. Well.... it isn't raining, and these are more of a dessert, so I don't think they count as Chilean. They can just be my American version :) But I wish my little brother auckie was here to have some with me.

3 cans Pillsbury butter crescent rolls
2 (8oz) packages cream cheese (softened)
1 cup sugar
1 teaspoon vanilla
1/4 cup butter (melted)
Cinnamon & sugar 
(this recipe has so many possibilities, you could add raisins or nuts or whatever you want inside with the filling. I think these would even taste good with some syrup and make it like a pancake! be creative!)

Instructions:
Unrolled and spread 1 & 1/2 can crescent rolls on bottom of un-greased pan. Combine softened cream cheese, sugar, and vanilla. Spread mixture over crescent rolls. Unroll and spread remaining crescent rolls over mixture. Spread melted butter over the top and sprinkle with cinnamon and sugar. Bake at 350 degrees for 20-30 minutes. 
Trevor had some before we left for Provo and he really liked them. I am pretty sure everyone at the party liked them too!
ENJOY!

wisconsin cauliflower soup (zupas)

The first time I ever went to Zupas was while living here in Salt Lake. I don't think they have this restaurant in San Diego, but they SHOULD. I love all of their food and soups! My favorite soups are the Lobster Bisque, the Mushroom Soup, and their Wisconsin Cauliflower Soup. I would say I take turns with rotating through these soups when I go, but lately I have only been wanting the Wisconsin Cauliflower Soup. It is just such a great comfort food soup, and I am a big lover of cheese :) So I thought I would look up recipes to see what I could find, and came across this. Now if only you could replicate their mushroom or lobster.... yum.

Zupa's Wisconsin Cauliflower Soup
2 tablespoons margarine or butter (1/4 stick)
1 medium onion, chopped
1/4 cup all-purpose flour
1/2 spoon salt
2 cups milk
1 can (13 3/4 to 14 1/2 ounces) chicken broth
1 head (2 1/2 pounds) cauliflower, cut into 1-inch pieces
1 teaspoon Dijon mustard
1 cup Sharp Cheddar cheese
1 cup Pepper Jack cheese

In 4-quart saucepan, melt margarine or butter over medium heat. Add onion and cook until golden, about 10 minutes, stirring occasionally. Stir in flour and salt; cook 2minutes, stirring frequently. Gradually stir in milk, chicken broth, and 1 1/2 cups water; add cauliflower and heat to boiling over high heat. Reduce heat to low; cover and simmer until cauliflower is tender, about 10 minutes. In blender (with center part of blender cover removed to allow steam to escape), blend cauliflower mixture at low speed in small batches until very smooth. Return cauliflower mixture to saucepan; heat over medium heat until hot, stirring occasionally. Remove saucepan from heat; stir in mustard and 1 1/2 cups cheese until melted and smooth. Garnish soup with remaining cheese to serve. 
ENJOY!

Bacon & Egg Breakfast Cups!

One of my favorite breakfast meals that my dad would always make for me were One Eyed Jacks. You know a piece of toast with an egg cooked in the middle of it? So when I came across these, it made me think of those fun mornings when my Dad would make me a One Eyed Jack. Isn't it funny how memories can be attached to food? Trevor could probably have eaten a dozen more of these!

What you need:

6 slices of bread
6 slices of bacon
6 eggs
1/2 cup of shredded cheese
salt & pepper


What to do:
1. Preheat oven to 400 degrees. Spray muffin pan with butter non-stick spray.
2. Using a cookie cutter (or a cup, I always use a cup, even to make One Eyed Jacks), cut circles out of bread slices about 3 inches in diameter.
3. Take bread circles and press them into the muffin pan, set aside.
4. Heat a large skillet on medium-high. Cook bacon on the skillet until partially cooked but still pliable, about 3 minutes.
5. Shape bacon strips into the toast cups, fill with 1 Tbs of shredded cheese. Place in the oven for 5 minutes, allowing the bacon to toast just a little more. Remove from oven.
6. Crack your egg and separate out most of the egg white. Drop eggs into the cups, sprinkle with salt & pepper to taste. Place back in the oven and cook until white begins to set, about another 8 – 10 minutes.  The yolk should be creamy.
7. Remove from oven when done and pop out using a spoon, serve warm.
 Enjoy!
Happy Memorial Day and long weekend  :)
These would be the perfect sleep in morning breakfast snack!

Berry Lemon Muffins.

I am loving that with school done, I am having some more time to bake and cook. I wanted to make something yummy and I decided I wanted to make something for my co-workers at the University of Utah Library. Just to thank them for being awesome and being so flexible with me while I was in school. They were always so great :) and worked with me and around my schedule. I found this recipe which actually just called for raspberries but I decided to add all kinds of berries :) the more the merrier right?

Ingredients
Servings: 14 large or 56 miniature muffins
1 1/8 cups sugar, divided
4 teaspoons finely grated lemon peel (from two large lemons)
2 cups all purpose flour
2 1/2 teaspoons baking powder
3/4 teaspoon salt
1/2 cup (1 stick) unsalted butter, room temperature
1 large egg
1 cup buttermilk
2 teaspoons vanilla extract
1 1/2 1/2-pint containers (about) fresh raspberries (I added raspberries, blueberries, strawberries, blackberries, you get the idea!)

Directions:
Preheat oven to 375°F. Line 14 standard muffin cups (or 56 minis) with paper liners. Mash 1/8 cup sugar and lemon peel in small bowl until sugar is slightly moist. Whisk flour, baking powder, and salt in medium bowl to blend. Using electric mixer, beat remaining 1 cup sugar and butter in large bowl until smooth. Beat in egg. Beat in buttermilk, then vanilla and lemon sugar. Beat in flour mixture.
Divide batter among muffin cups (the 2/3-3/4 level worked well for minis). Top each large muffin with 4 raspberries (or mini muffins with one each). Bake muffins until lightly browned on top and tester inserted into center comes out clean, about 35 minutes (baking time was on the shy side of 20 minutes for mini muffins).
 Enjoy! :)

mexican market.

I spent the afternoon with "cinco ninas" a while back and documented some of our adventures while at the Mexican Market. Our family friends introduced me to an amazing Mexican donut called Conchas. They are a Mexican shell-shaped pastries that are sold in Mexican bakeries (panaderias). All the pastries were cheap cheap cheap and such a good deal! The girls love that these donuts look like a, for lack of a better word, boob. HA. They taught me that the best way to eat them is to zap it in the microwave for a little bit so they are super warm and go a little softer. They were soooooooooooooo good. So if you find yourself around a Mexican Market or bakery, get yourself a Concha! Or some "Cha Chas" haha
It is perfection really.

fruit cockatil.

A couple weeks ago Trevor and I had dinner with some family friends. They made the yummiest fruit cocktail and thought I had to share the recipe (Thanks Molly!) So here you go, something super yummy to eat. I couldn't help but think how nice this would be on a hot summer afternoon... the summer really couldn't come soon enough for me right now ;) haha

What you need:
2-3 cans crushed pineapple
1 quart pears with juice
1 quart peaches with juice
grapefruit
oranges
grapes
kiwi
pomegranate seeds
1 can orange juice concentrate


Mix it up and ENJOY :)

Flourless Peanut Butter Cookies

via google images

Sunday night I got a little sweet tooth. I wanted something yummy, but didn't want to have to make a mess in the kitchen. Then I found this wonderful recipe for flourless peanut butter cookies! How cool is that? Normally I would have my own picture, but I ate these way too fast for picture taking... like I said, I was hungry. What I love about this recipe is you can do so much with it....or not....which is the beauty of its simplicity! I am even interested in using this organic sugar substitute because with the organic peanut butter we used, this has the potential to be one healthy cookie!

What you need:
  • 1 cup peanut butter
  • 1 cup white sugar
  • 1 egg
Different things you could add: brown sugar, real peanuts, vanilla extract, cinnamon, gummy bears :) haha the list really does go on and on.... ENJOY!

good fortune.

Looking for the perfect party favor? Or just an adorable snack? You should try making some chocolate dipped Chinese fortune cookies! So cute, and so yummy! &the best part is you can make a variety of these little guys. I just added sprinkles to mine, but you could use anything from nuts, coconut, drizzle it with some white chocolate, heck you could even ground up a butter finger and sprinkle that all over it.... okay, that sounds really good. You can really stick anything on it that will stick to the chocolate, kapeesh? 
So knock yourself out and try attaching different things. BE CREATIVE! In fact if you make these sometime you should send me a picture/tell me what you used on yours!

What you need:
Fortune cookies
Chocolate chips
Topping

What to do:
Take the Chinese Fortune Cookie and dip it in the melted down cholate.
Sprinkle your topping on it before the choclate melts.
Let the cookie dry.

In The Microwave
The microwave is fantastic for melting chocolate chips. You can control the amount of time you put them in the microwave, and you can check on them easily to see how the process is coming along. To start, melt a handful of chocolate chips in a microwave-safe bowl for about a minute. Take out the bowl, and check to make sure the chocolate is melted all the way through. Give it a good stir, and then put it back in for another 30 seconds or so. You can also melt chocolate bars in the same manner; just make sure they are cut up into small pieces that resemble chocolate chips.

super bowl food.

Didn't you love the Golds Gym's commercial that showed the big plate of finger food, and then said... "See you tomorrow!" How true is that! I don't know about you guys, but after my birthday weekend, and the super bowl... I am stuffed. But since we are on the topic of super bowl food, I had to share the amazing meatball recipe that Trevor makes.


Trevor's "Jamaica Me Crazy" Meatballs
+This recipe is made completely of Costco finds, but could be modified with any brand of meatballs or sauces.
Ready, Set, GO!
Bag of Meatballs (we use the whole bag, but you can use as much as you need)
1 cup of water
Half the tub of "Johnny's Jamaica Me Sweet Hot & Crazy Dressing & Marinade (we use half of the tub when you are making the whole bag of meatballs)
Dump everything in a crock pot, set to High, and leave in for about 2 hours.


These meatballs are so easy to make! They have such a yummy kick to them! This is something you could put together and take to a party or shower etc. and know they will be a hit. Don't forget to bring the tooth picks!

waffles and peanut butter.

Don't you all put peanut butter on your waffles? In my family we grew up putting peanut butter and syrup all over our waffles and pancakes. I remember going on sleepovers and having pancakes or waffles and asking if they had some peanut butter. I have received some very strange looks when I ask for the peanut butter, but a pancake or waffle just isn't the same without it for me now. My family also has always made homemade syrup, so it was always hard for me to have "cold" syrup straight from the bottle when I would eat breakfast at other people's houses. I mean after I asked for the accommodation of the peanut butter I always felt awkward asking if I could heat up the syrup first too haha. Since I had a hard week I decided Saturday morning to treat myself to some waffles :) My parents gave us a really cool waffle maker for Christmas, like the kind you would use at a hotel, and it made the best waffles! So I thought I would share the family recipe here for you all. Enjoy :)

Leavitt's Waffles
3 cups flour
5 tsp baking powder
1 tsp salt
2 TBSP sugar
4 large eggs
2 1/4 cups milk
1 1/2 tsp vanilla
2/3 cup oil

Don't beat the mixture too much. It will be thick. Pour 1 cup batter per batch. This recipe is easily doubled, tripled etc. My family usually makes tons of this and we have ourselves a waffle feast!

How do you eat your Oreos?

I have never been a huge fan of chocolate... I know call me crazy. I blame it on originally being from Canada and having relatives send me the most amazing candy. Almost all the candy bars are made with Cadbury chocolate. So when I eat something here in the States and it is all Hershey chocolate, it just doesn't measure up. I also hate hate hate chocolate chips... chocolate cake is okay, I don't mind brownies... but at the end of the day I guess you could say I am a vanilla girl all the way.
Because of this, growing up I would split my Oreos in half and lick the frosting off (well lick isn't the right word... it was more like using my two front teeth and scraping it into my mouth, haha) Then I would discard the Oreo cookie part. But every once in awhile my mother would make homemade Oreo cookies. Now these were Oreos that didn't require me to take the cookie part off... because they were simply amazing. So here you go... my mama's quick and simple recipe for homemade Oreo Cookies! I made a big batch of them for the young primary class that me and Trevor teach at church... they loved them :)
 
OREO COOKIES
3 pkgs Duncan Hines Devil’s Food Cake mix
6 eggs
1 cup vegetable oil
Work together with your hands because it’s too heavy for a blender (but you could with a Bosch or Kitchenaid).  Roll into walnut size balls.  Do not press.  Bake at 375 for 10 – 12 mins.
When you take them out of the oven tap pan on the counter, this will flatten the cookies.  Put two cookies together with the following:

ICING
¼ cup margarine or butter                        
1 – 8 oz. pkg. cream cheese
4 cups icing sugar                                     
tsp vanilla
Mix together.  Spread generously.

You can also double the icing recipe if you want more filling in your cookies! --I double mine :)
 Do you think I used enough Pam? HA.
  These are some double stuffed ones :)

potted pumpkin pies...

 I wish I was throwing a Thanksgiving Party, having a fall wedding, or something!
I stumbled across this great idea for treats/favors/gifts or for whatever you want them for at inchmark.
I HAD to share this with you all. It is just too adorable not to.
I hope some of you can find a good excuse this month to whip these up!
 Make your favorite pumpkin pie recipe and cook them in the jars!

Then add your whipped cream.
Voila! :) A Potted Pumpkin Pie.